

How To Use Behringer Mixer
In this guide, we will show you how to go started with the Behringer PRO-1. Nosotros volition go over how to set it upwards, create a sound, how the modulation department works, and how to utilise the sequencer and arpeggiator. We will also go over the different settings available in the Synthtribe software.
- PRO-ane connections
- Back panel
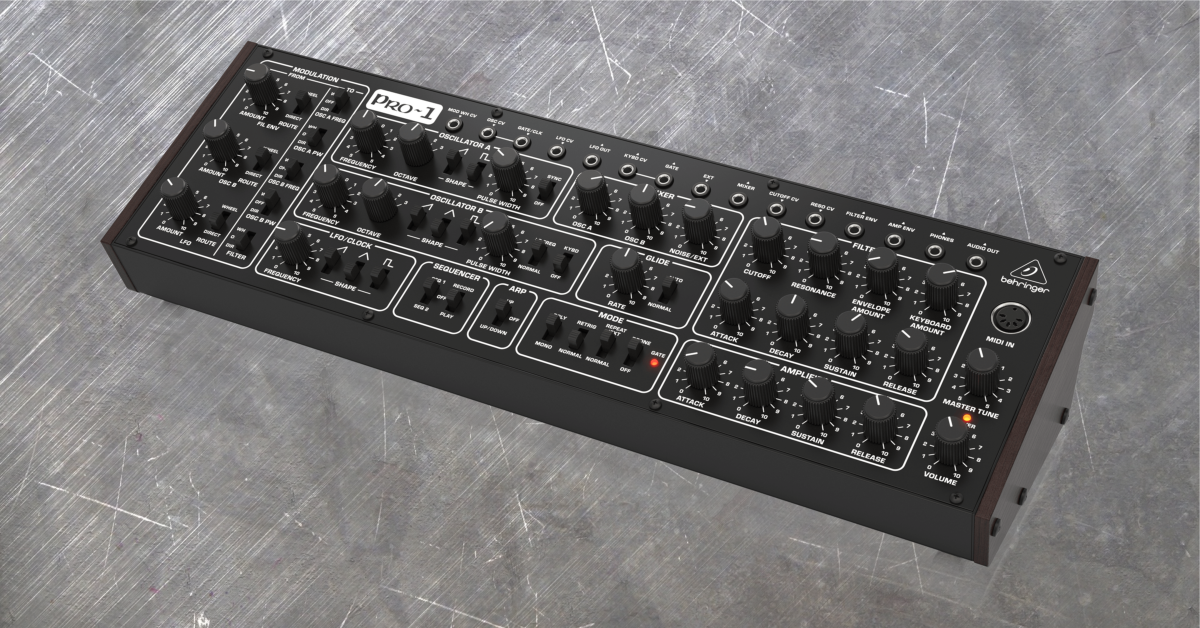
- Front end panel
- PRO-1 setup
- Creating sound on the PRO-1
- Modulation section
- Mode department
- Arpeggiator and sequencer
- Synthtribe settings
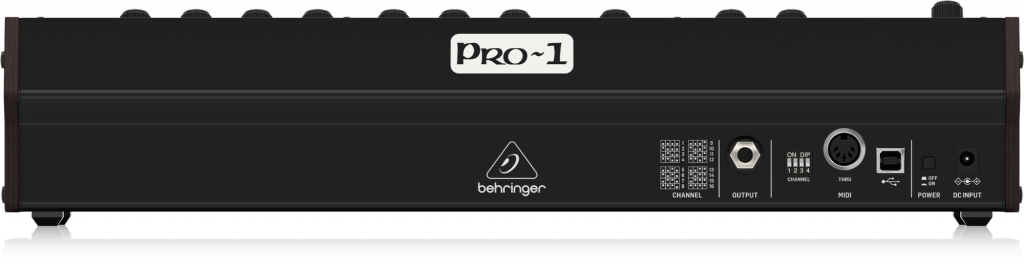
- OUTPUT: Line level output to connect to an audio interface/mixer/powered speakers.
- MIDI Channel: Sets the MIDI input channel to control the PRO-ane from external gear. This diagram shows the positions the dip switches need to be in for each channel:
- (PRO-i MIDI Channel.png)
- MIDI OUT/THRU: Outputs the MIDI data received from the MIDI IN and USB port. Too outputs MIDI notes from the PRO-one arpeggiator or sequencer.
- USB: Sends MIDI information in and out to a computer/tablet. The PRO-one volition be recognized as a class-compliant MIDI device on the computer/tablet. This connection is as well used to adjust the settings of the PRO-one with the Synthtribe application on the computer/tablet.
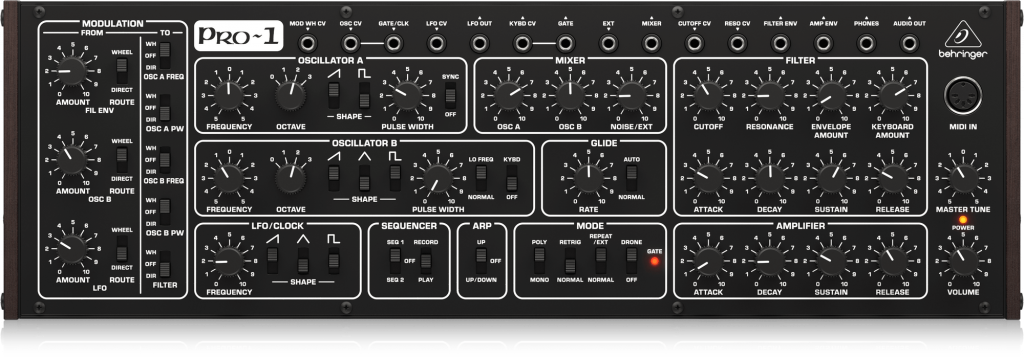
- MOD WH CV: CV Input from a mod wheel that has a CV Out.
- OSC CV: 1V/Oct CV pitch input to control the pitch of the oscillators.
- GATE/CLK: Clock/Gate input to control the sequencer and arpeggiator speed.
- LFO CV: CV input to control the rate of the LFO.
- LFO OUT: CV output of the LFO.
- KYBD CV: 1V/Oct CV pitch output generated from the MIDI IN, USB MIDI IN, sequencer, and arpeggiator.
- GATE: Gate output from the sequencer and arpeggiator.
- EXT: Audio input that passes through the filter and amplifier. When the EXT audio input is used, the racket source is disabled, and the Racket/EXT knob controls the external sound level.
- MIXER: Output of the mixer.
- CUTOFF CV: CV input to control the filter cutoff.
- RESO CV: CV input to control the filter resonance.
- FILTER ENV: Outputs the CV generated past the filter envelope.
- AMP ENV: Outputs the CV generated by the amplifier envelope.
- PHONES: Headphone output.
- Audio OUT: Mono output of the PRO-1.
LET IT WARM UP: Y'all can play the PRO-one while information technology is warming upward, only the tuning may non be stable correct away. This is because the PRO-i has analog circuits that demand to warm up to operating temperature for its tuning to stabilize. The warmup time may take a lilliputian longer, depending on the room temperature.
- Turn the volume down on the bottom correct of the PRO-one.
- Connect the PRO-1 PHONES output on the forepart to headphones, or connect the OUTPUT on the back with a TS or TRS cablevision to the line input of a device similar a keyboard amp, powered speaker, mixer, or interface
- Power it on and let it warm up for about 15-20 minutes.
Once y'all accept everything set up and connected, let'south create a basic audio! The patch nosotros'll be providing should create a uncomplicated sawtooth sound that drones. This is a bones sound, and nosotros'll become through the settings, section by section, but in one case you've dialed it in, feel free to adjust the controls more to get the sound you want!
- FREQUENCY: Fix to 0.
- OCTAVE: Prepare to ane.
- SAW SHAPE: Gear up to the up position.
- SQUARE SHAPE: Set up to the downwardly position.
- PULSE WIDTH: Set to 0.
- SYNC: Set to OFF.
- FREQUENCY: Set to 0.
- OCTAVE: Set to three.
- SAW SHAPE: Set to the up position.
- TRIANGLE SHAPE: Set to the down position.
- Square SHAPE: Set to the down position.
- PULSE WIDTH: Gear up to 0.
- LO FREQ: Set up to NORMAL.
- KYBD: Set to the upward position.
- OSC A: Gear up to five.
- OSC B: Set to 0.
- Dissonance/EXT: Set to 0.
- CUTOFF: Set to ten.
- RESONANCE: Gear up to 0.
- ENVELOPE Amount: Gear up to 0.
- KEYBOARD Corporeality: Set to 0.
- Set on: Set to 0.
- DECAY: Ready to 0.
- SUSTAIN: Gear up to 0.
- RELEASE: Prepare to 0.
- Set on: Set to 0.
- DECAY: Set to 0.
- SUSTAIN: Ready to x.
- RELEASE: Fix to 0.
- Primary Tune: Ready to 0.
- VOLUME: Set up to 5.
- FIL ENV AMOUNT: Set to 0.
- FIL ENV Route: Prepare to DIRECT.
- OSC B Corporeality: Prepare to 0.
- OSC B ROUTE: Prepare to Straight.
- LFO Amount: Set up to 0.
- LFO ROUTE: Set to Straight.
- OSC A FREQ: Ready to OFF.
- OSC A Pow: Set to OFF.
- OSC B FREQ: Set to OFF.
- OSC B Prisoner of war: Set up to OFF.
- FILTER: Gear up to OFF.
- FREQUENCY: Set to 0.
- SAW SHAPE: Set to the down position.
- TRIANGLE SHAPE: Set to the downwards position.
- Square SHAPE: Set to the downward position.
- First Switch: Set to OFF.
- 2d Switch: Prepare to PLAY.
- Switch: Set to OFF.
- First Switch: Set up to MONO.
- Second Switch: Set up to NORMAL.
- Third Switch: Gear up to NORMAL.
- Fourth Switch: Set to DRONE to output a abiding audio. Gear up to OFF if you lot are using a MIDI controller.
- Charge per unit: Set to 0.
- Switch: Set to NORMAL.
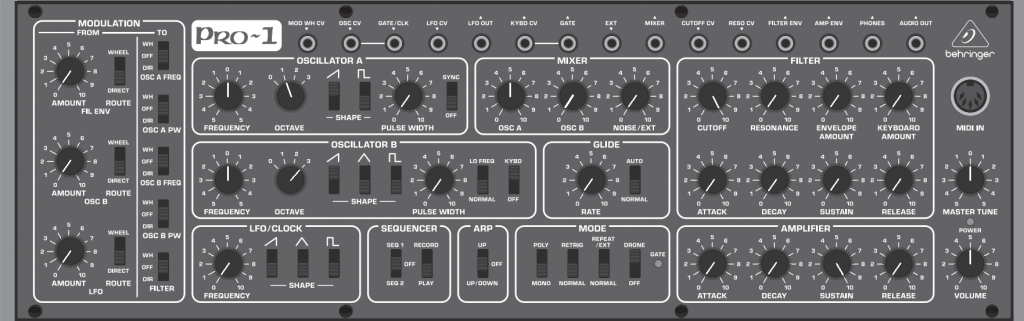
Pro-1 Default Patch settings
The modulation section has three different sources, v different destinations, and two modulation paths that you can create between the source and destination.
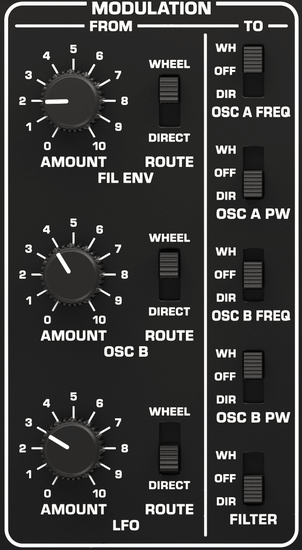
PRO-one Modulation Section
- FIL ENV: Modulation output from the envelope in the Filter department.
- OSC B: Modulation output from the Oscillator B department. Gear up the LO FREQ/NORMAL switch to normal if y'all want the Oscillator B to act equally an LFO.
- Set the KYBD/OFF switch to OFF if y'all do not want the frequency of oscillator B to be changed by the notes you lot send from your MIDI controller.
- LFO: Modulation output from the LFO.
- A shape needs to exist turned on in the LFO/CLOCK section for the LFO to output modulation.
- OSC A FREQ: Controls the pitch of Oscillator A.
- OSC A Pow: Controls the pulse width of Oscillator A's square wave.
- OSC B FREQ: Controls the pitch of Oscillator B.
- OSC B Pow: Controls the pulse width of Oscillator B'southward square moving ridge.
- FILTER: Controls the filter cutoff.
The Route switch sets the path the modulation source is sent to. Y'all can utilise all three modulation sources at in one case but you only take 2 paths to send to. This means that if 2 or all modulation sources are all set to route to the directly path, all destinations that are set to DIR will be controlled past those modulation sources. If yous gear up one of those modulation sources to send to the bicycle path instead, that modulation source will only control the destinations that are fix to WH.
- DIRECT will ship the source straight to all destinations that are set to DIR in the MODULATION TO section. The AMOUNT knob for that modulation source volition directly control the amplitude of that modulation source.
- WHEEL will ship the source to all destinations that are ready to WH in the MODULATION TO section. The AMOUNT knob for that modulation source sets the maximum amplitude for the modulation source but to actually send the modulation, the mod wheel of your MIDI controller needs to be turned up or CV needs to be sent into the Modern WH CV jack on the front panel of the PRO-one. The mod bicycle will so control the aamplitude of the source with the range of 0 to the level that has been set with the AMOUNT knob for that modulation source.
The mode section of the PRO-1 alters the way the synth behaves. We volition get over each way switch and what that switch does.
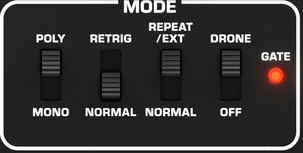
PRO-1 Modes Section
- POLY or MONO: This switch sets the PRO-1 to monophonic mode or two annotation paraphonic mode.
- RETRIG or NORMAL: This switch sets how the amplifier envelope should trigger when playing legato. Setting this switch to RETRIG will re-trigger the amplifier envelope every time a new note is played. Setting this switch to NORMAL volition just trigger the commencement annotation played in the legato phrase.
- REPEAT/EXT or NORMAL: Setting this switch to Repeat/EXT will repeatedly trigger the envelopes at the speed the LFO FREQUENCY knob is set to, or they will trigger every time a clock or gate point is sent into the GATE/CLK CV input on the front console. Setting this to NORMAL will have the envelopes set to trigger from a MIDI controller.
- DRONE or OFF: If gear up to DRONE, the audio volition constantly output. You volition need to turn up the sustain knob in the AMPLIFIER section to hear the audio. If ready to OFF, you will but hear sound when the amplifier envelope is triggered via MIDI or echo mode.
Arpeggiator and sequencer
The PRO-1 has a uncomplicated arpeggiator with two patterns and a 64-step sequencer that can hold two patterns. These features are great to have a musical line play while you adjust the parameters of the synth. To use the arpeggiator or sequencer, y'all will need a MIDI controller connected to the MIDI IN or the USB MIDI port.
To activate the arpeggiator, set the ARP switch to UP or Upwards/DOWN. Next, hold down the notes you would like to arpeggiate on your MIDI controller, and the PRO-1 volition start arpeggiating the notes in the pattern y'all selected.
The Pro-1's sequencer allows you to input up to 64 notes and rests for each of the two patterns. You will need a MIDI controller to tape the notes to the sequencer, but once the sequence has been recorded, yous tin can play the sequence without the MIDI controller.
- Create a patch or use the basic default patch in this guide.
- Connect a MIDI controller into the MIDI IN of the PRO-i.
- Gear up the switches in the sequencer section to OFF and PLAY.
- Set the 2d sequencer switch to Tape.
- Set the beginning sequencer switch to the sequence you would like to tape to, SEQ 1 or SEQ ii.
- Enter your notes past playing them on your MIDI controller. You can enter a residuum by flipping the second sequencer switch to PLAY, so dorsum to RECORD.
- Once y'all are done recording, flip the beginning sequencer switch to OFF.
- Flip the second sequencer switch to PLAY.
- Flip the first sequencer switch to the pattern you recorded to, SEQ 1 or SEQ ii. Playback volition start as soon as this switch is flipped.
- Pressing different MIDI notes on your MIDI controller will transpose the sequence.
Connecting the PRO-i to a computer with a USB cable volition allow you to admission additional settings for the PRO-1 through the Synthtribe application, which you tin can download from Behringer'due south PRO-i product page. The Synthtribe application besides allows you to factory reset the PRO-1 and update its firmware.
- MIDI IN Channel: Selects the MIDI channel the PRO-ane volition receive to exist controlled from an external MIDI device.
- Pitch Bend Semitones: Adjusts the range of the pitch bend cycle from the MIDI Controller in semitones.
- Primal Priority: Sets which notes will have priority when pressing more than than i key in mono way or more than ii keys in poly mode.
- MIDI Clock Out: Sets whether the USB MIDI out or the 5-pivot MIDI out connection should output MIDI clock betoken.
- Restore Manufactory Settings: This volition reset all settings on the PRO-1 to the default settings and erase the two sequences in the PRO-1.

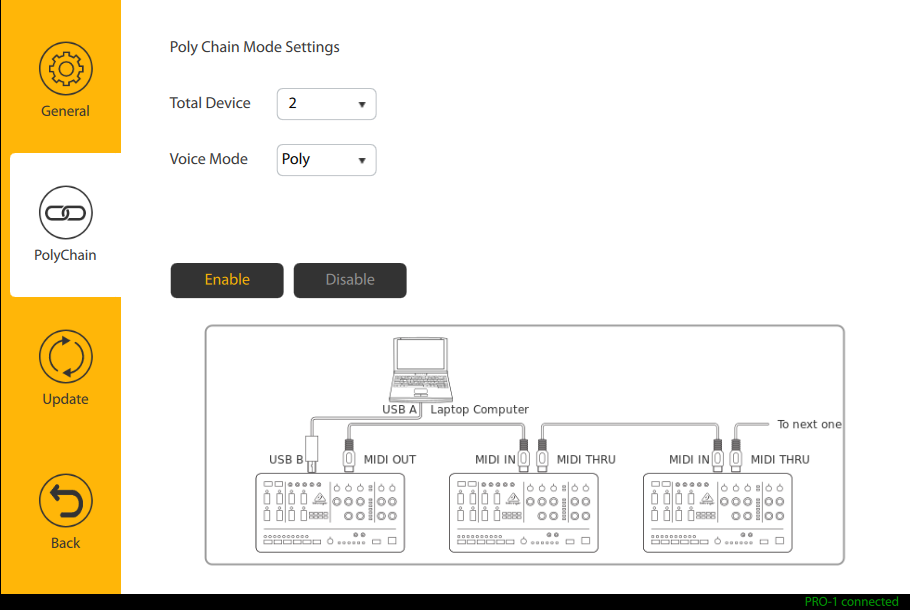
The Behringer PRO-one tin be set every bit a PolyChain if yous connect multiple PRO-1's, up to xvi. This gives you true polyphony as each PRO-1 will act every bit a voice, with each vocalism containing its own oscillator, filter, and VCA.
To set this upwardly:
- Follow the wiring diagram every bit shown in this tab in the Synthtribe settings.
- Cull how many total PRO-1'southward are being connected.
- Choose the vox style you would similar.
Mono volition play all PRO-1s together to create a monstrous single voice. Poly way will allow y'all to play as many notes as you have PRO-1'south continued together. Once the PRO-one's have been connected, and the right settings are selected, click enable to apply the PolyChain configuration to the PRO-1'south.
You lot can check if your PRO-i is upwards to date in the update tab of the Synthtribe software. This tab will display the version number and will let you know if there is an update available for your PRO-1.
Related Articles
When you need assistance, Sweetwater has the answers!
Our knowledge base contains over 28,000 expertly written tech manufactures that volition requite you lot answers and help you lot go the most out of your gear. Our pro musicians and gear experts update content daily to go on y'all informed and on your way. Best of all, information technology's totally Costless, and it'south only another reason that you get more at Sweetwater.com.


How To Use Behringer Mixer,
Source: https://www.sweetwater.com/sweetcare/articles/behringer-pro-1-setup-guide/
Posted by: flowersarkly1973.blogspot.com
0 Response to "How To Use Behringer Mixer"
Post a Comment